Welcome to VDC Green!

This blog was born out of our passion for "green" design, our continual pursuit of new innovative sustainable technology, and our commitment to learning and growing as professionals. We will be researching and discussing a new topic related to sustainable practices frequently, so check back with us often.

We hope this blog provides you with some useful knowledge, maybe a little inspiration, and a lot of fun!

Wednesday, September 30, 2009

Green Roofs


Green roofs, otherwise known as living roofs or eco-roofs, are environmentally-sensitive roofing systems that allow plants to grow on the surface of what would otherwise be just a protective covering for houses and commercial buildings. Green roofs help protect conventional roof waterproofing systems while adding a wide range of ecological and aesthetic benefits and are a powerful tool in combating the adverse impacts of land development and the loss of open space.

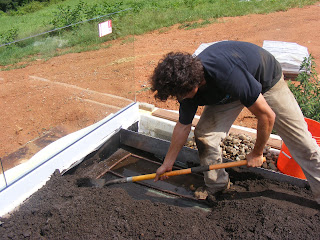
Just recently, VDC had the opportunity to help install a green roof locally on a residence in Leceister, NC collaborating with a local green roof company here in Asheville, Living Roofs, Inc. Working alongside owner Emilio Ancaya, VDC helped with the installation of pervious pavers and the plant material for the green roof.


So WHY build a green roof?

There are several great reasons to go green on a roof, many of which not only benefits the environment and has heating and cooling cost savings, but can also help a project qualify for LEED credits.

Reduces the volume of storm water runoff

Green roofs are known to retain 50-60 percent of the total annual runoff volume of a roof. Most importantly, the soil retains 90-100% of the critical first hour of heavy rainfall that can overwhelm storm water management systems.


Improve the quality of runoff water

Acting as natural bio-filtration devices, green roofs help reduce water contamination and help trap and filter pollutants from entering our storm water, thereby allowing cleaner water to enter our water basins.

Reduce the effects of ‘urban heat Island effect’

Covering dark conventional roofs with green roofs can significantly reduce the temperature above the roof and in the heat of the summer, the temperature on green roofs can be significantly cooler than conventional roofing anywhere from 20 to 60 degrees cooler.

Control building temperature

For hundreds of years, living roofs were used in various countries to prevent heat from escaping or penetrating during different seasons. Controlling a building’s interior is possible by replacing the asphalt surface of the roof with plants and soil, which act as insulators to keep buildings cooler in summer and warmer in winter.


Provide soothing and calming spaces to look down upon

With improvements being made in every aspect of green roof technology, we should see more green roofs offering a greater diversity of plants as well as more human access. Either way green roofs are more aesthetically pleasing, giving the viewer a soothing vista to gaze upon.


Create wildlife corridors for migrating species

Green roofs can be used to create wildlife habitats to supplement or replace diminishing open space in developing areas. Many migrating species pass through urban centers and green roofs can offer these creatures the food, shelter, and respite they need to successfully finish their journey.

The costs of going green

Long-term financial benefits

Green roofs will lower the cost of storm water management in urban areas. Once a green roof is in full operation, it should cut down on the amount of heating and air conditioning a building needs to maintain comfortable temperatures. These reductions should be seen in the monthly costs of electricity and natural gas.

Other Economic Benefits of green roof

  • Potential to reduce the size of HVAC equipment on new or retrofitted buildings (capital and operational savings).
  • Potential to reduce the amount of standard insulation used.
  • Potential to incorporate cooling and/or water treatment functions.
  • Potential to reduce or eliminate roof drains.
  • Potential to meet regulatory requirements for stormwater management.
  • Provision of amenity space for day care, meetings, and recreation;
  • Aesthetic appeal, increasing the value of the property and the marketability of the building as a whole, particularly for accessible green roofs. For example, American and British studies show that “good tree cover” adds between 6 to 15 per cent to the value of a home. Green roofs offer the same visual and environmental benefits.


Savings for the Homeowner

The average green roof lasts for an average of 40 years as opposed to the 17-year life expectancy of roofs installed with standard roofing materials, like cedar shake. Living roofs come with lower maintenance, repair and replacement expenditures than “dead” roofs. A reduction should also be noted in waste water charges.


What makes up a green roof?
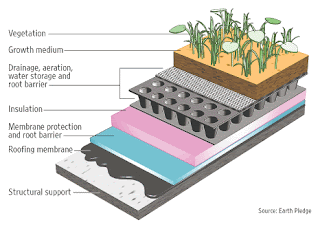
A green roof system is an extension of the existing roof which involves a high quality water proofing and root repellant system, a drainage system, filter cloth, a lightweight growing medium and plants.

A green roof starts with a waterproofing layer. For existing roofs, the existing waterproofing (asphalt shingles, tar and gravel, etc.) can be used. For new construction, a single-ply membrane such as EPDM (ethylene propylene diene monomer – a rubber typically used for pond liners) or TPO (thermoplastic polyolefin – an environmentally friendly and recyclable roofing product mostly used in large-scale commercial buildings, like the Rogers Centre) is usually used. EPDM and TPO are quick to install, and also act as a root repellent, preventing plant roots from compromising the waterproofing.

On top of the waterproofing layer is a drainage, water retention and filter layers. These layers also act as root barriers. More importantly, they help manage the amount of water that is retained on the roof and ensure that the growing medium doesn’t clog the drainage layer and wash away.

The next layer is the growing medium. This is usually a lightweight, custom mixture, composed mostly of expanded stone, volcanic rock, perlite, with only a 10% to 20% organic content. The goal is to find a balance between a soil that will sustain the plants, but that won’t weigh so much as to require excessive support from the building structure.

Finally are the plants. These are chosen to match the composition and depth of the growing medium. For shallow, lightweight roofs, a mixture of sedum and delosperma varieties are typical. These shallow-rooting succulent plants do well in dry conditions (requiring less maintenance) and in “poor” soil. With deeper roofs, the plant selection can expand to include native grasses, wildflowers … even some herbs and vegetables.


Thursday, August 27, 2009

No Flushing Required

Water and energy… arguably two of the most important topics in our current dialogue on sustainability; so when technologies are developed that significantly address the conservation of both of these, we feel it is appropriate to look a little deeper. This post reviews a concept that could conserve an estimated 5 billion gallons of water per day in the U.S. alone. This could potentially save U.S. water-users nearly $4 billion annually not to mention other significant savings in energy and maintenance costs. In addition, this technology would create a nutrient-rich compost that could be used to enhance garden performance and productivity. What is this technology? …


Behold, the composting toilet.
(photo taken at Warren Wilson College Eco-dorm near Asheville, NC)

Although this technology is not new (self contained “earth commodes” have been around since the 1800’s - see below) there have been great advances in the past decade. Today, many composting toilet fixtures look strikingly similar to ‘designer-label’ conventional fixtures and are very simple to use and maintain. There are many manufacturers of composting toilets, here is a link to a good site for comparisons between various manufacturers and models. http://www.comparethebrands.com/compare/134


mid 19th Century composting toilets

Today's composting toilet - not bad eh?

Composting toilet systems have four basic components: the seat fixture, the chute, the composting chamber and the ventilation system.

image from http://static.howstuffworks.com/gif/composting-toilet-diagram.gif

The principle is simple. Human waste falls down the chute into the composting chamber. Usually a scoop of composting powder or sawdust is added to the chamber after each use.

Some systems actually utilize a microflush system that uses less than a liter of water per flush. In microflush systems there is usually either a small heating system to facilitate drying or a small leachate drain that takes excess water to a drain field or engineered wetland. There are also vacuum systems that allow for the waste to be delivered to a chamber located on the same level or even above the fixture.

In the composting chamber, microorganisms gradually break down the waste into compost. After a certain timeframe, aged compost is removed and can be used as fertilizer, the composting process having broken down harmful substances in the waste.

The ventilation system usually uses a small electric (often solar powered) fan that creates a mild vacuum in the chamber and ensures that any offensive odor is vented to the outdoors. In my research, most composting toilet users are very surprised to find they have no odor issues.


There are a few potential drawbacks to composting systems:

Additional composting materials: There will be the additional expense of purchasing and replenishing a supply of sawdust or composting powder as a scoop is placed in the composting chamber after every use.

Additional maintenance: Composting systems do require some minimal periodic maintenance to rotate and/or remove compost. Although some of the products have mechanical systems that automatically ‘stir’ the compost, many systems require someone to manually pull some sort of lever to stir the compost. Depending on the system type/size and frequency of use, the composed needs to be removed anywhere from every two weeks to every two years or longer.

Biodregadable items only: Care must be taken not to place trash or other objects in the chamber that will not quickly break down. Cleaners and other chemicals must not be ‘flushed’ as they potentially harm the friendly composting microorganisms and could contaminate the compost. Also no cigarettes or open flames (for obvious reasons).

Permitting and approvals: Many municipalities are not familiar with this technology and it may not be part of accepted standards. Thus, there is often an extended review process involved. One should definitely meet with the appropriate governmental agency well before installing a composting system.

Expense: Cost varies widely in composting systems but quality systems can be purchased for around $1,500, comparable to the cost of installing a conventional septic system. The paybacks are more immediate if these systems are employed in new construction. In more urban applications, where septic systems are not utilized, composting systems will likely have a 5 to 10-year payback period, depending on the water and sewer rates charged by municipalities. For a family the size of ours (5) here in Asheville, we would expect to see a savings of at least $200 per year on our water/sewer bill if we used composting toilets instead of conventional reduced flow (1.6 gallons per flush) fixtures, and over $400 in annual savings over conventional, full-flow fixtures. Overall, my guess is that composting toilet systems are ultimately much more cost effective than this...

In Asheville, water treatment systems and associated water department activities account for over 40% of the city's municipal electricity use and takes up nearly 1/3 of the municipal carbon footprint. This magnitude of resource consumption is similar for other cities and towns across the nation. Composting human waste offers tremendous potential savings when you consider that about 1/3 of the water that is used in residential homes is flushed down the toilet.

All in all, the small inconveniences incurred in using composting systems would appear to pale with respect to the amount of water and energy that these systems could potentially conserve. Here are a couple of other sites that contain additional information on composting toilets:

http://www.toiletabcs.com/toilet-water-conservation.html

http://www.compostingtoilet.org

Monday, May 25, 2009

Water Harvesting


What is rain water harvesting?

Water harvesting has been around for centuries and can be traced back through human history almost as far as the origins of agriculture.  Basically, rain water harvesting is the capturing and storing of rainfall to irrigate plants or to supply people and animals. Water harvesting involves a variety of methods used to get as much water as possible out of each rainfall. The great thing about water harvesting is that it will help you save money on your monthly water bills and reduce your dependence on municipally-supplied water as well as relieve stress on the environment and recharge groundwater tables. 

Planning Your Water Harvesting System

To put it simply, all you need for a water harvesting system is rain, and a place to put it. Your system can be simple, using contoured areas so that water flows directly to planted areas, or more sophisticated, using storage systems that can contain captured water for later use.  © 2009 Rainwater Solutions - "Continuous Guttering"


Types of Water Storage

You can store water in a variety of ways: steel drums, oak barrels or underground storage tanks, to name a few. One of the simplest forms of water harvesting is to place a drum or barrel on a raised platform under a rain gutter downspout. 


Rain Barrel

Usually a rain barrel is composed of a 50 to 55 gallon drum, a vinyl hose, PVC couplings, and a screen grate to keep debris and insects out. I have a very simple rain barrel at my house that captures water runoff from one-half of my home's roof and which I use to irrigate my garden throughout the summer months.

The rain barrel should have an external pipe with a shutoff valve to control the amount of water withdrawn. What I also did for my system is raise the rain barrel off of the ground to allow for greater head pressure. If this is not possible to do, a pump may be required to get the proper amount of pressure for your use, particularly if the water will be used as part of an irrigation system.  

Another important element is the overflow for excess water.  On my rain barrel system I have put a 6 foot garden hose that distributes the overflow water into a mini-rain garden that helps to contain and slowly disperse the water over-time, into the landscape.  It is important to keep the overflow water from spilling on the ground near the foundation of a home


System Maintenance

Regular maintenance is critical to any dependable water harvesting system. Make sure your gutters and downspouts are free of debris. Periodically clean and/or repair dikes, berms and channels to prevent excessive erosion.


Cisterns

Cisterns are another method of water harvesting and can be constructed of nearly any impervious, water retaining material.  They are distinguishable from rain barrels only by their larger sizes and different shapes. They can be located either above or below ground, and in out of the way places that can easily be incorporated into a site design.  Commercially available systems are typically constructed of high density plastics.  Cisterns can either be constructed on-site or pre-manufactured and then placed on-site.  

A simple method of construction, sometimes still utilized in rural areas, is to first lay a concrete floor in a small excavated area and then cover the dirt walls with several coats of plaster to assure water proofing.  If the cistern is dug correctly its round walls can then be capped with a concrete lid.  Small cisterns of up to 5000 gallon capacity have been constructed in this manner.

Materials utilized for the construction of cisterns can include redwood, polyethylene, fiberglass, metal, concrete, plaster (on walls), ferro-cement and impervious rock such as slate and granite.  Typical components of a cistern roof top catchment system include: the roof, gutters, and downspouts with connection to top of cistern, and outflow connections for appropriate uses, i.e., irrigation. 

Generally all rainwater tank/cistern designs should include these components: 

  • A solid secure cover
  • A leaf / mosquito screen at cistern entrance
  • A coarse inlet filter with clean-out valve
  • An overflow pipe
  • A manhole, sump, and drain to facilitate cleaning
  • An extraction system that does not contaminate the water (e.g. a tap or pump)


What are the advantages of rain water harvesting?
Lawn and garden watering make up nearly 40% of total household water use during the summer. A rain barrel collects water and stores it for when you need to water plants or wash car. Rain barrels provide an ample supply of free "soft water" containing no chlorine, lime or calcium making it ideal for gardens, flower or the potted plants. Also, according to the US Environmental Protection Agency, a rain barrel can potentially save most homeowners about 1,300 gallons of water during the peak summer months.


Through our research and exploration of rain water harvesting we came across several good sources of information that we wanted to pass along:

Book:  Water Storage : Tanks, Cisterns, Aquifers, and Ponds        by Art Ludwig
Website: www.harvesth2o.com - an online rain water harvesting community with lots of great information 
A useful guide put out by the North Carolina State University Extension


Monday, April 20, 2009

Fun with Rain Gardens

above: my rain garden experiment

Just under a year from the time we moved into our home, we experienced stormwater in a way we never had before. This also presented an opportunity to learn some lessons in stormwater management that I thought may be of interest.

Let me explain. Runoff from the adjacent street collects in a drainage structure which used to discharge into a small pipe that ran along the northern boundary of our lot into a stream off property.

It was certainly no great feat of engineering but at the time seemed to serve it’s purpose (seemed being the key word). I’m sure whoever designed and installed the system had a basic understanding of the workings of stormwater - something like: water runs down road to low point. Put drain inlet at aforementioned low point. Attach pipe to drain inlet. Run pipe downhill and in a straight line (shortest distance right?). Point outlet to stream and we’re done. This equation works great until additional ingredients work their way into the formula. Leaves + twigs + dirt + plastic grocery sacks + discarded hamburger wrapper + tropical storm = lots of water not where it is supposed to be. We leaned this when Hurricane Ivan paid a visit in Sept of 2004.

Basically there was substantial clogging of our stormwater pipes which caused the system to literally break apart, spewing a geyser of muddy stormwater which severely eroded our yard and then puddled in our basement.

I tried several times to repair the system, but time and again, nature did not comply. I decided to try a different method of stormwater management, which takes some cues from Mother Nature herself.

I began by abandoning the underground pipe in favor of a surface system. The new system would be composed of a series of small rain gardens, terraced down the slope. The contractor who installed the previous system had buried the pipe in a trench with coarse road-base stones ranging in size from a baked potato (hey, I’m from Idaho) to small watermelons. I reused these stone to line my rain garden and armor the stream channel connecting the gardens.


I also placed several drop structures in the system. This helps to dissipate the force of the velocity during heavy runoff – it also creates a great ‘babbling brook’ resonance during rain storms.

above: cascading drop structures in the "Fern Garden"


I have found that the stormwater entering my gardens carry a surprising amount of sediment. The first pond of the system is the deepest (about 10” -12”) and has a wide, rock-lined overspill. This creates a relatively calm pool in rain events and most of the sand, trash and large sediment will drop out very beginning. I clean this out a couple of times a year and use the sediment to fill holes or spread elsewhere in the yard.


above left: street runoff entering upper pool
above right: sand and other sediment deposited in pool


I spent the most amount of time building the channel through the fern garden on the north yard of the house. This channel is stone-lined with several small waterfalls. I also laid a path by recycling broken concrete pieces from demolition (more on that in another post).

above: upper and lower pools in the fern garden

The final pool is the largest and I have found that it does a decent job at settling out clay fines and other small particles. I have started cultivating an iris garden on the margins of the lower ponds. All of the irises (Blue Flag Iris or Iris versicolor for horticulture geeks) are from a single plant (all my project budget would allow) that I’ve been dividing over the past three seasons– they do extremely well in these heavy, moist soils. I created a shelf lined with stone to protect the iris from swifter currents that develop in very heavy rain events. I plan to experiment with introducing some rushes and other plants later this season.

above: iris garden

Other plants in this garden include wild strawberry (provides quick cover), many species of native fern, rhododendron, buttercup (vigorous but also invasive – be careful), violets, a flowering dogwood, and black berry and raspberry canes. There are also some trillium and crocus for early spring interest, as well as several varieties of tulip. Most of these plants were transplanted from elsewhere on my lot, given me by friends, rescued from development sites, or are uninvited guests that haven’t been caught yet.

I have had the rain gardens in for over three years now and have really enjoyed this experiment. They have held up well and provide a lot of interest especially when it rains. I haven’t had water in my basement since the gardens went in. They also prevent several cubic feet of sediment and trash from entering our river systems.

Feel free to contact me if you have any comments or would like to know more.

-Ryan